Ansible Linux Automation Project
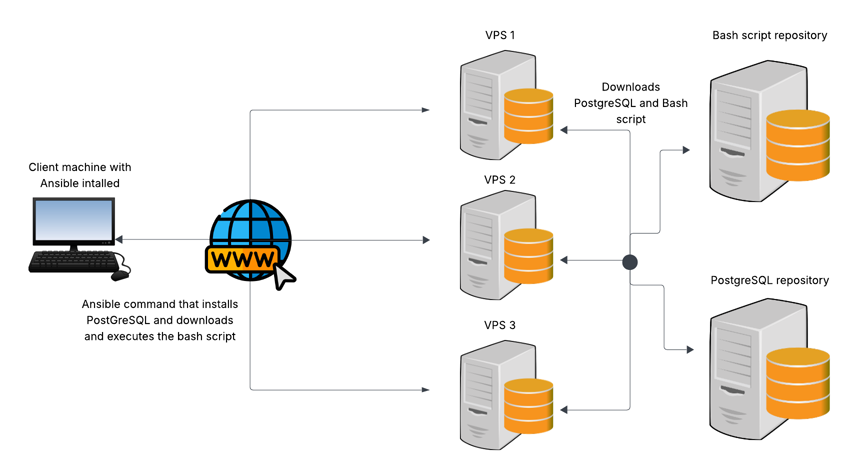
In this project I will deploy 3 different VPS (virtual private server) machines in the cloud. Then I will be using Ansible on my local machine to ensure these 3 virtual machines have PostgreSQL installed. I will also execute a bash script on each machine that will allow me to view useful status information about each machine.
The goal of this project is to learn the basics of Ansible by doing this simple task.
Here’s a visual diagram of the project:
Step 1: Install Ansible on your local machine
Let’s install Ansible on our local machine to get started.
The way to install Ansible depends on the OS you’re currently using. I use Arch Linux myself.
To install Ansible on Arch Linux, enter this command:
sudo pacman -S ansible
To install Ansible on Debian/Ubuntu, enter this command:
sudo apt install ansible
To install Ansible on Fedora/Red Hat, enter the following command:
sudo dnf install ansible
Step 2: Choose a cloud provider to set up your virtual machines
I will be using IONOS myself in this project. Any other VPS hosting provider will be just fine. Feel free to use any Linux VPS hosting service of your choice.
Other VPS providers I recommend are:
- DigitalOcean
- Linode
Step 3: Configure Ansible on your local host machine
After you’ve installed Ansible onto your local machine, it’s time to configure your Ansible configuration file.
First, generate a configuration file by entering the following command:
ansible-config init --disabled > ansible.cfg
You have the freedom to place the .cfg file in your home directory or in /etc/ansible/ansible.cfg.
Personally, I like to keep it in the /etc/ansible/ folder.
Once your ansible.cfg file has been generated, open it with your favourite text-editor and make sure that host_key_checking is set to False. This is a connection security feature that is not necessary for this beginner level project.
To disable this feature, make sure your ansible.cfg looks like this:

Now create a second file called hosts in the same directory. The hosts file contains the IP addresses of the servers you want to control using Ansible.
In your hosts file, enter your IP addresses under [(group name)] and then write your credentials under [(groupname):vars]
Feel free to name your group whatever you want, I chose to name my group vps.
My hosts file looks like this:
[vps]
87.106.3.118
87.106.3.96
217.154.155.7

[vps:vars]
ansible_user=root
ansible_password=ComeFlyWithMe58
Step 4: Execute your first Ansible commands
We’ve now successfully set up Ansible, and it’s time to execute our first Ansible command.
My favorite way of ensuring that Ansible is configured correctly is to execute this command:
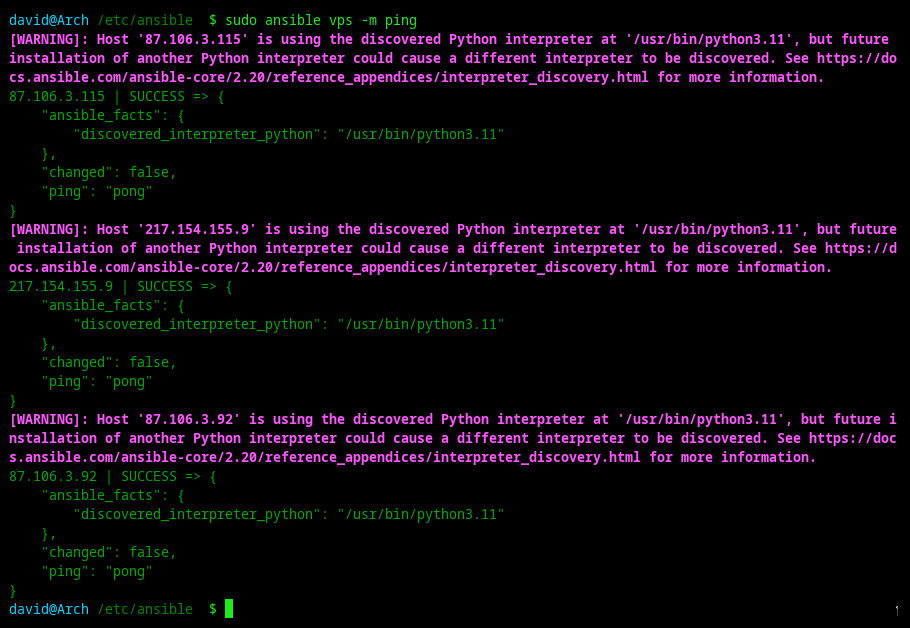
ansible vps -m ping
It’s a simple command that makes sure every machine in the hosts file is accessable and responsive.
If your configuration is correct, the terminal output should look something like this:
Now let’s execute the command that completes the main task of this project:
- Install PostgreSQL on each machine
- Download and execute a bash script
ansible vps -m shell -a "apt update && apt install -y postgresql && wget -q https://raw.githubusercontent.com/NilsDavid01/ServerPerformanceStatus/main/ServerPerformanceStatus.sh -O /tmp/ServerPerformanceStatus.sh && chmod +x /tmp/ServerPerformanceStatus.sh && /tmp/ServerPerformanceStatus.sh" --become
As you might notice, this command is quite long and very hard to remember. This is where Ansible playbooks become handy. Ansible playbooks are pre-made execution scripts saved as YAML files.
In the next step, we will create our first playbook that does the exact same two tasks as we just did.
Step 5: Create your first Ansible playbook
Name the playbook file whatever you want, as long as the extension is .yaml.
I named my playbook postgresql_serverstatus.yaml.
Add the following to your YAML file:
---
- name: Install PostgreSQL and run server performance script
  hosts: vps
  become: yes
  tasks:
    - name: Update apt cache
      apt:
        update_cache: yes
        cache_valid_time: 3600

    - name: Install PostgreSQL and wget
      apt:
        name:
          - postgresql
          - postgresql-contrib
          - wget
        state: present

    - name: Download ServerPerformanceStatus script
      get_url:
        url: https://raw.githubusercontent.com/NilsDavid01/ServerPerformanceStatus/main/ServerPerformanceStatus.sh
        dest: /tmp/ServerPerformanceStatus.sh
        mode: '0755'
        force: yes

    - name: Execute the performance script
      shell: /tmp/ServerPerformanceStatus.sh
      register: script_output

    - name: Display script output
      debug:
        var: script_output.stdout_lines
Then execute the playbook with this command:
ansible-playbook postgresql_serverstatus.yaml
Summary
Congratulations, you have now successfully completed this Ansible beginner project.
In this project walkthrough, we have:
- Installed and configured ansible
- Created our own ansible playbook
- Using ansible to install postgreSQL and executed a server status bash script onto 3 different VPS