GPG Encryption API with CI/CD on AWS
In this project we will be deploying an API on AWS using Github actions and ElasticBeanstalk.
This API is written in C# and has the ability to encrypt and decrypt text messages using the GPG (Gnu Privacy Guard) encryption method.
Please note that this documentation will not focus on how to develop a functional API.
This documentation will focus on how to deploy an application stored on a Github repository to AWS cloud by using Github Actions.
What is Github Actions?
Github Actions is a feature that is available for use in every Github repository. Github Actions allows developers to automatically execute tasks each time they send a pull request or push request to their repository. The most common type of task that Github Actions is commonly used for is cloud deployment, which means that the application of the repository will automatically deploy on the cloud after a pull/push request has been sent.
What is Github Secrets?
Github Secrets is a security feature available in every Github repository that helps developers to store their password and other sensitive information in their repository without having it exposed in the source code.
The way it works is that a developer can tell their Github repository that any time the string “SECRET_PASSWORD” appears in their source code, the repository should recognise this as a codename to the actual password that is heavily protected by the repository.
So to put it simply, Github Secrets is used for developers to store sensitive information in repositories securely without having it exposed in the source code.
What is Elastic Beanstalk?
AWS Elastic Beanstalk is a service by Amazon Web Services for deploying applications which deploys, manages and scales web applications automatically.
Step 1: Choose a Github repository
The first step involves choosing a github repository that contains an application that you can host on AWS.
I will be using this project that I created myself: https://github.com/NilsDavid01/gpg-api
Feel free to fork my repository or choose another one.
Step 2: Create a deployment script inside of your repository
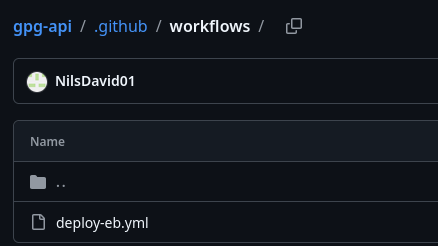
In this step we will create a .yaml deployment script that will be resposible of deploying our application on AWS. Make sure you place the .yaml file into the directory “root-project-folder/.github/workflows/”, otherwise it won’t get executed by your repositoy.
This screenshot shows where I placed my deployment script:
This is how my yaml deployment script looks like:
name: Deploy to Elastic Beanstalk

on:
  push:
    branches:
      - main

jobs:
  deploy:
    runs-on: ubuntu-latest

    steps:
    - name: Checkout repository
      uses: actions/checkout@v4

    - name: Setup .NET
      uses: actions/setup-dotnet@v4
      with:
        dotnet-version: '8.0.x'

    - name: Restore
      run: dotnet restore GpgApi/GpgApi.csproj

    - name: Build
      run: dotnet build GpgApi/GpgApi.csproj --configuration Release --no-restore

    - name: Test
      run: dotnet test GpgApi.sln --configuration Release --no-build

    - name: Publish
      run: dotnet publish GpgApi/GpgApi.csproj -c Release -o publish

    - name: Copy EB extensions
      run: cp -r .ebextensions publish/

    - name: Generate deployment package
      run: |
        cd publish
        zip -r ../deploy.zip .

    - name: Deploy to Elastic Beanstalk
      uses: einaregilsson/beanstalk-deploy@v22
      with:
        aws_access_key: ${{ secrets.AWS_ACCESS_KEY_ID }}
        aws_secret_key: ${{ secrets.AWS_SECRET_ACCESS_KEY }}
        application_name: ${{ secrets.EB_APPLICATION_NAME }}
        environment_name: ${{ secrets.EB_ENVIRONMENT_NAME }}
        region: ${{ secrets.AWS_REGION }}
        version_label: ${{ github.sha }}
        deployment_package: deploy.zip
Step 3: Setup your AWS environment
In case you don’t have an Amazon Web Services account, you can easily create one by following this link: https://signin.aws.amazon.com/signup?request_type=register
Once you’re successfully logged in, you should see this page:

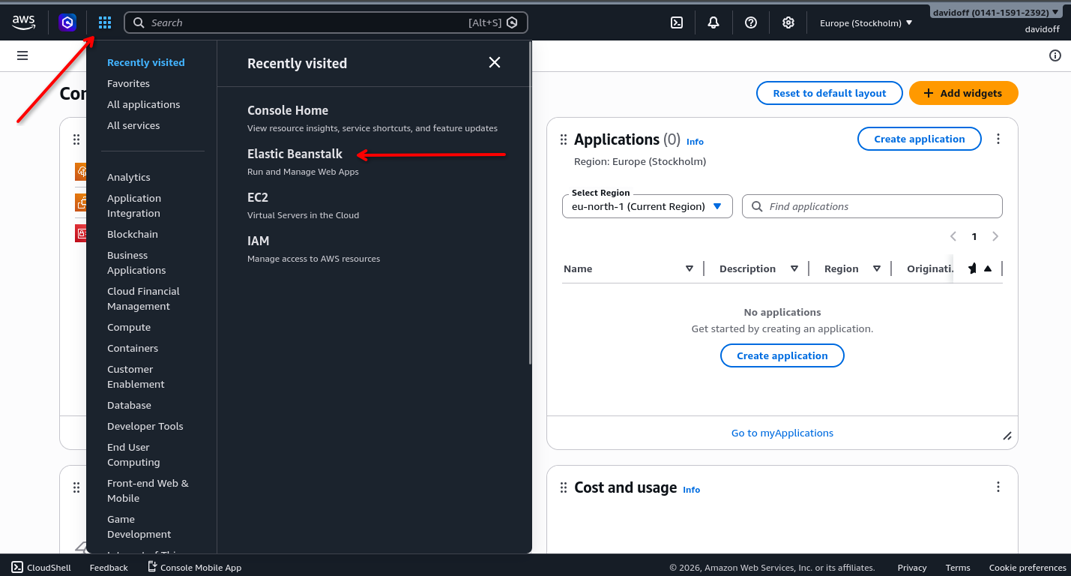
Now head over to the Elastic Beanstalk section by opening up the “Services menu” by pressing the icon consisting of 9 squares in the top left corner·
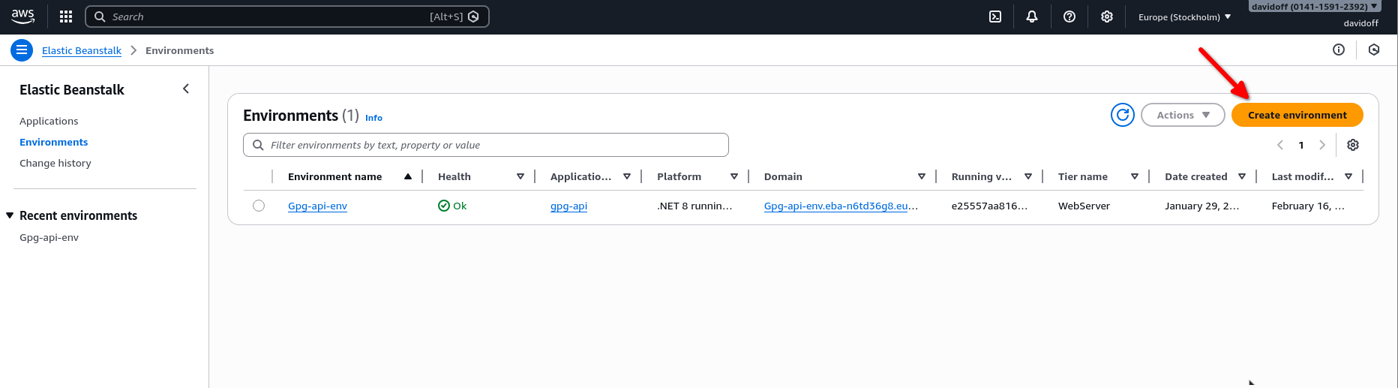
Then press the button “Create environment" and follow through the whole setup guide.
Step 4 : Add AWS credentials to Github Secrets.
To ensure our API gets deployed on AWS automatically on every git push request, we must give our github repository our AWS Elastic Beanstalk EC2 credentials.
Navigate to Github repository settings and head over to “Secrets and variables” and add these secrets:
-
AWS_ACCESS_KEY_ID -
AWS_REGION -
AWS_SECRET_ACCESS_KEY -
EB_APPLICATION_NAME -
EB_ENVIRONMENT_NAME
Secret 1 and 3 should be associated with your AWS access key ID and AWS secret access key.
You can create both of these keys by heading over to “Security credentials” from your AWS home console.
Secret number 2 should be set to the region of your ec2 instance location, you can find this information by going to “EC2” » “Instances”. For example mine is set to “eu-north-1a”.
Secret number 4 is simply the name of the Elastic Beanstalk application you’ve given yourself.
Secret number 5 is the name of the Elastic Beanstalk environment.
Both application name and environment name can be found in the Elastic Beanstalk main page.
Step 5: Send a git push request to deploy the application on AWS
Deploy the application on AWS by running this command: git push origin main
To see if the deployment was successful, please head over to the “Actions” sections from your github repository.
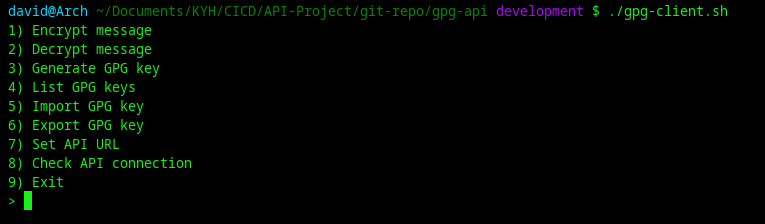
Step 6: Run the bash client to interact with the API.
Follow these steps to execute the bash script and test if the API is functioning correctly:
git clone https://github.com/NilsDavid01/gpg-api.gitcd gpg-api/sudo chmod +x gpg-client.sh./gpg-client.sh
Summary
In this project walkthrough, we have:
- Configured Github Actions to automatically deploy our application on AWS every time we do a git push request
- Sucessfully completed the Elastic Beanstalk setup
- Learnt about CI/CD